

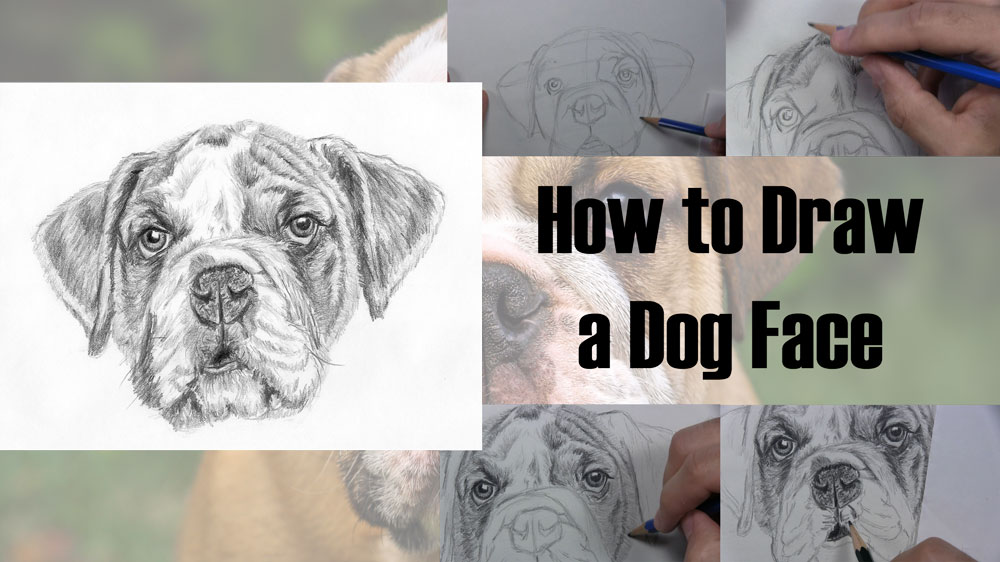
how to draw a realistic dog
Would you similar to know how to depict a dog face?
When searching for ideas of what to describe, people ofttimes look no farther than their pets for inspiration. Information technology'southward only natural for canis familiaris owners to want to depict a portrait of their favorite four-legged companion.
Perchance you have a canis familiaris of your own that yous would just love to draw.
Or, maybe you don't ain a dog but you just think they are absurd. Maybe you see then much personality in the face of a dog that you lot just have to describe information technology, or at least try.
Just what if you don't know how?
In this tutorial, I volition show yous a step-by-step method for drawing the face of a dog. This tutorial will be basic enough for you to keep up with every bit a beginner but detailed plenty for y'all to still end upwards with a pleasing realistic drawing of a dog face.
Apply a Reference Photo of a Dog Face
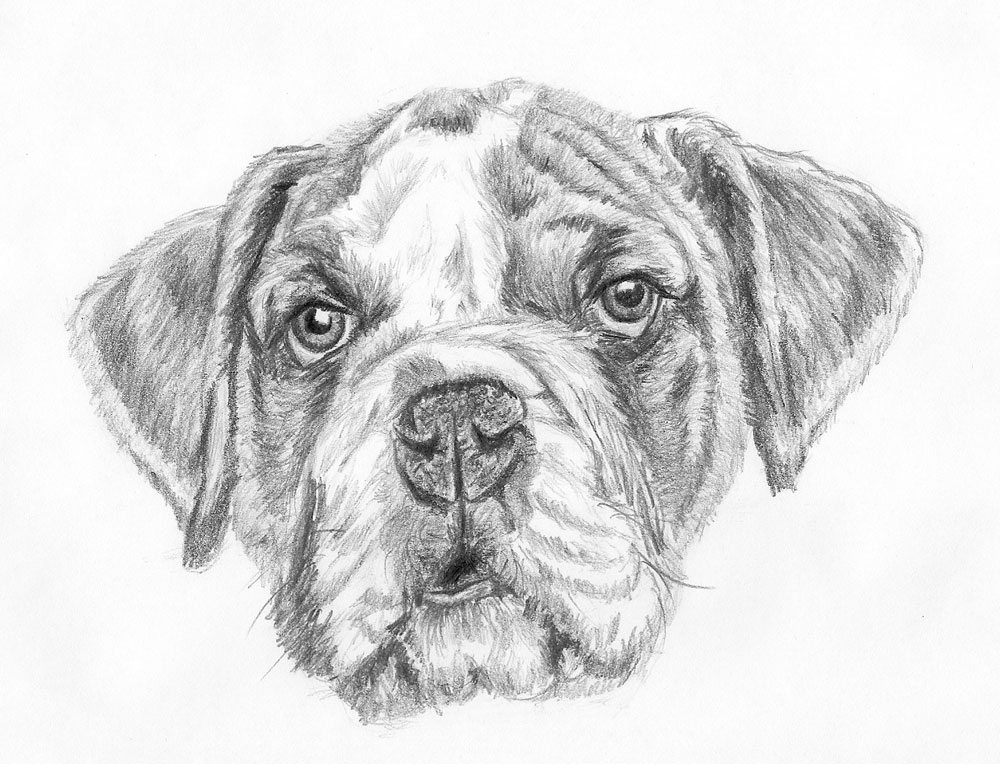
Here's a picture of the little guy we are going to draw. As you tin see, this tutorial volition show you how to depict the face up of a bulldog, an English bulldog to exist precise! We will employ this every bit our reference photo and to help us with proper placement of all the domestic dog's facial features.
Y'all can use the bones concepts you larn from this tutorial and apply them to drawing other dogs. Since there are so many different breeds of dogs with such a multifariousness of physical traits, using a reference photo is an of import step in capturing accurate features of any dog face you cull to depict.
Materials Used for This Drawing
Here is a list of the materials I am using for this drawing.
If you don't accept some of these materials, don't let that cease y'all. A canvas of newspaper, a standard pencil, and an eraser are a great start!
If you wish to buy any of these materials, they can exist found at your local art store, or you can buy them using the links below.
Chapter Disclaimer: The links below are affiliate links. I volition receive a small commission if a purchase is made through i of these links. Learn more than here.
- Canvass of drawing paper
- Sheet of folded paper to prevent smudging
- HB, 2B, and 6B graphite pencils
- Kneaded eraser
How to Depict a Dog Face Video Tutorial
You lot can watch the time-lapse video version of this tutorial beneath. Watch it one time all the way through to get a sense of the overall process. Then sentry a 2nd time and draw along with me, pausing every bit needed.
If y'all prefer, you can apply one of the links direct below the video to admission the complete version of this tutorial. It volition prove yous my process for how to draw a canis familiaris face step by step with video clips at normal speed.
Already a member of the Let's Draw Today Social club? Become to your courses.
Equally an alternative, when you lot sign up for the Let's Describe Today Newsletter, I volition requite y'all the extended video course version of this tutorial and 9 others (x in all) equally a free gift!
Free Bonus: Click hither to get access to 10 free drawing video tutorial courses. Describe along with me in the total-length version of this tutorial and nine others every bit I show you lot i pace at a time my entire process for drawing each subject from start to end.
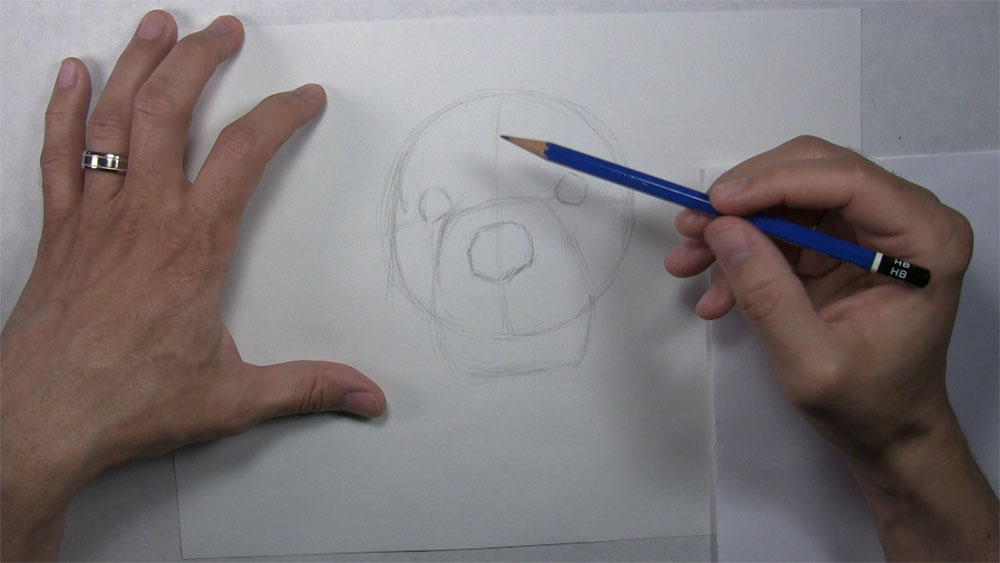
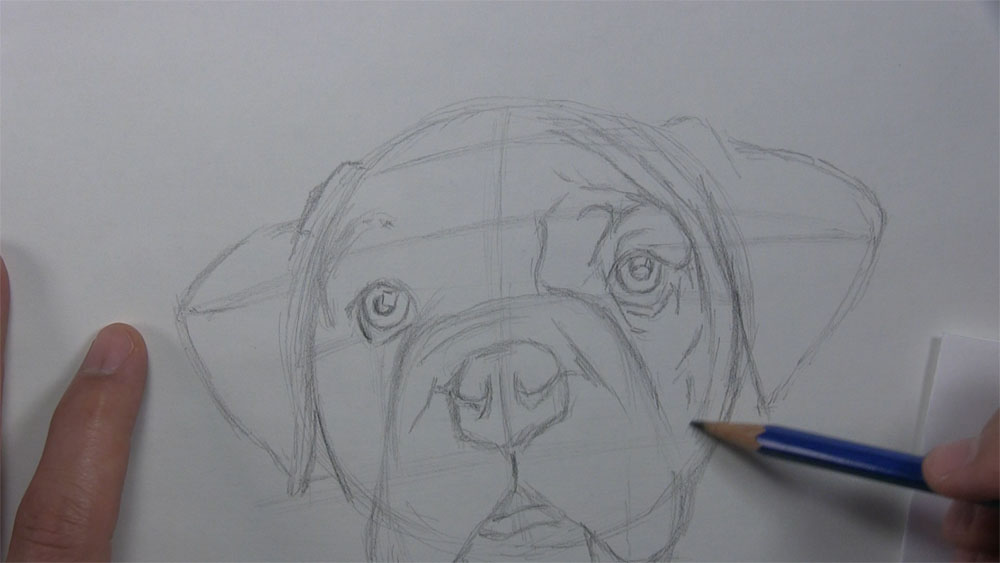
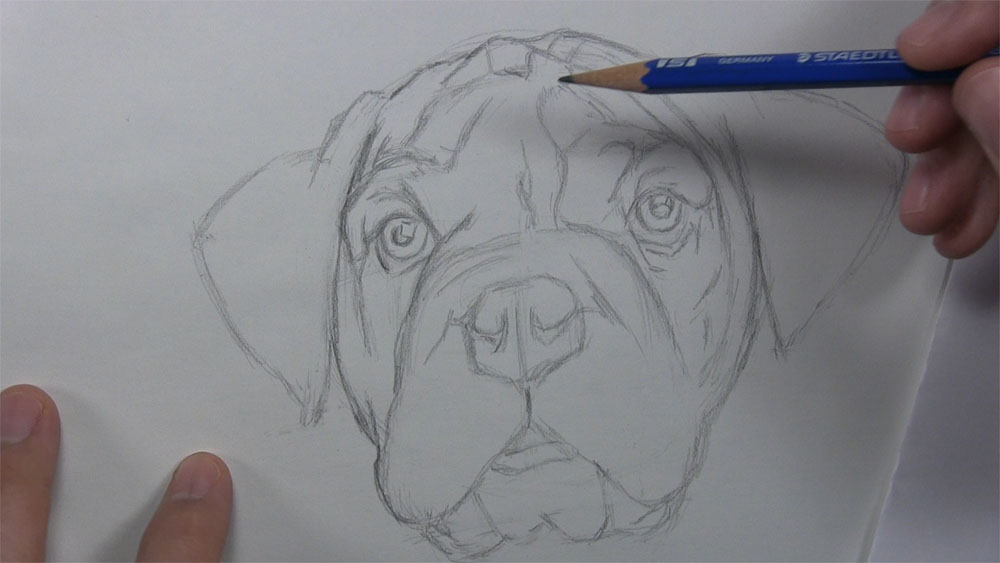
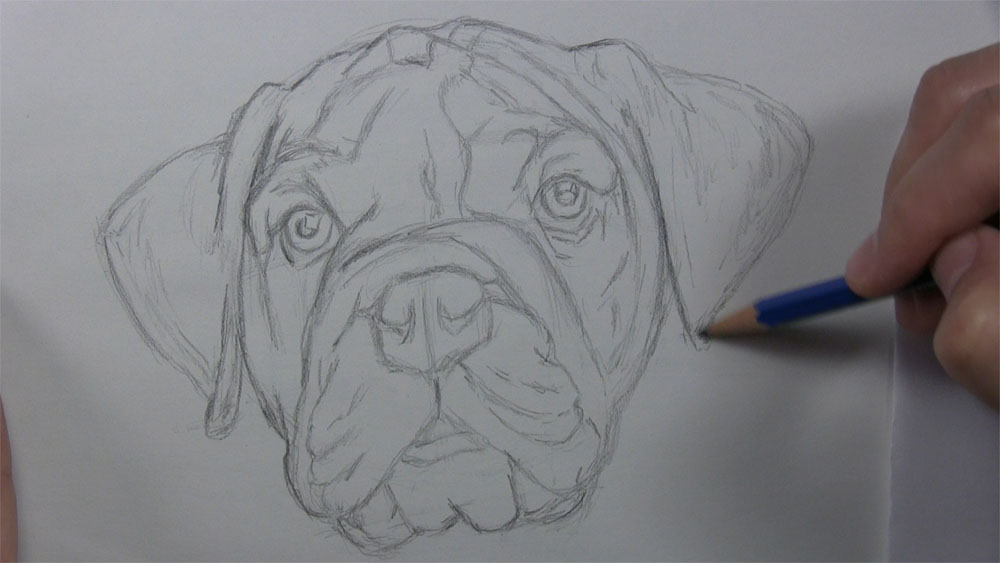
Draw Guidelines for the Dog's Facial Features
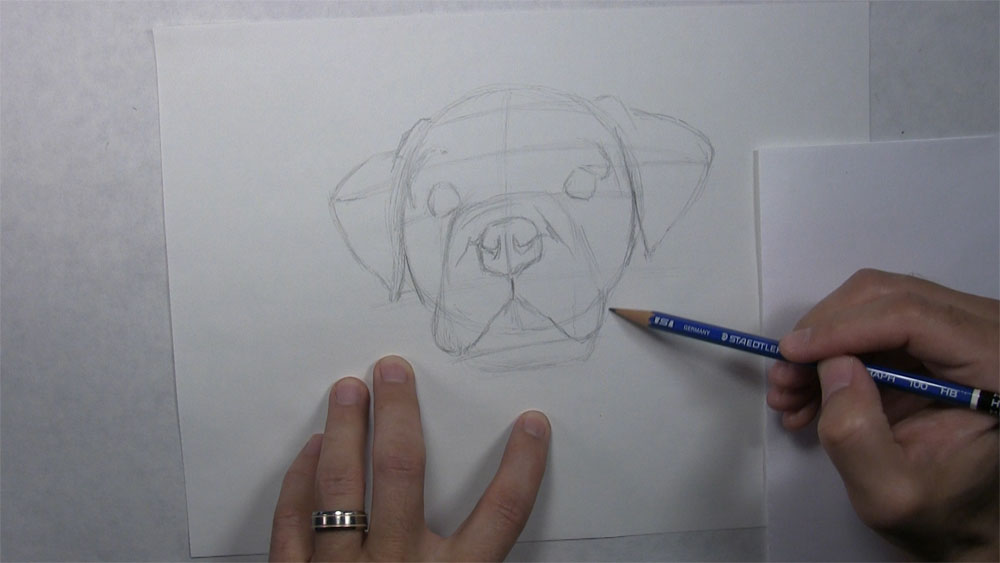
Let's first run across how to depict the head of a domestic dog. Showtime with an HB pencil and a rough sketch of a circle for the domestic dog's caput. Next, sketch a vertical line and a horizontal line for some facial guidelines. There should be an e'er and so slight curve to each of these lines due to the tilt of the dog's head.
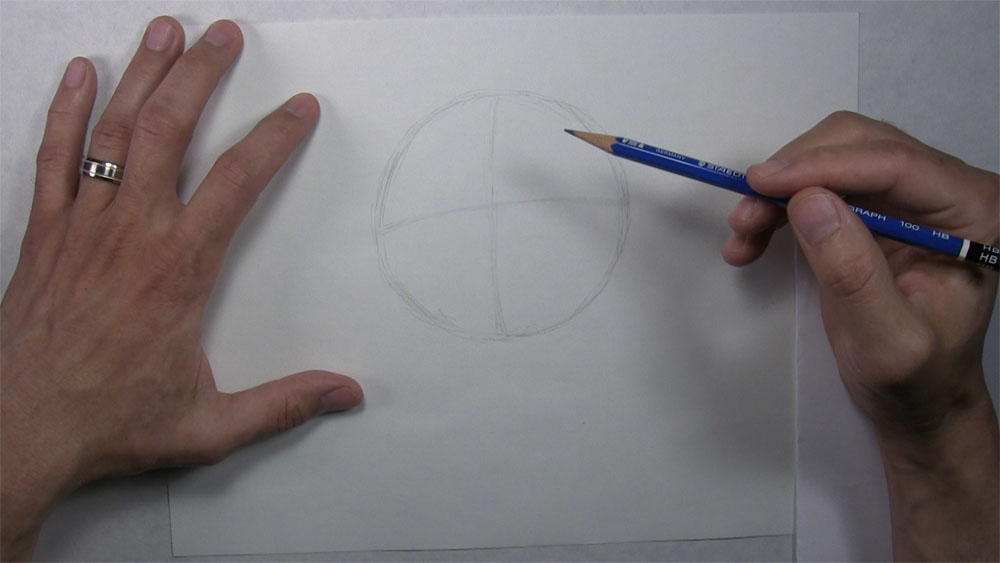
Programme the placement of the optics. They should be approximately an equal distance from the center. Then, sketch the shape of the snout. Extend the snout below the circle and make the bottom parallel to the horizontal guideline on the circumvolve.
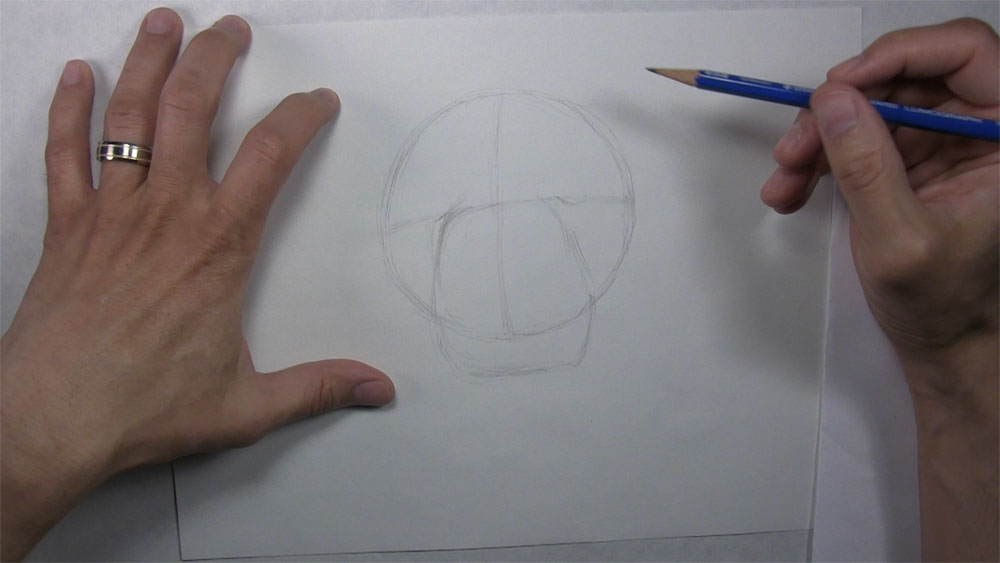
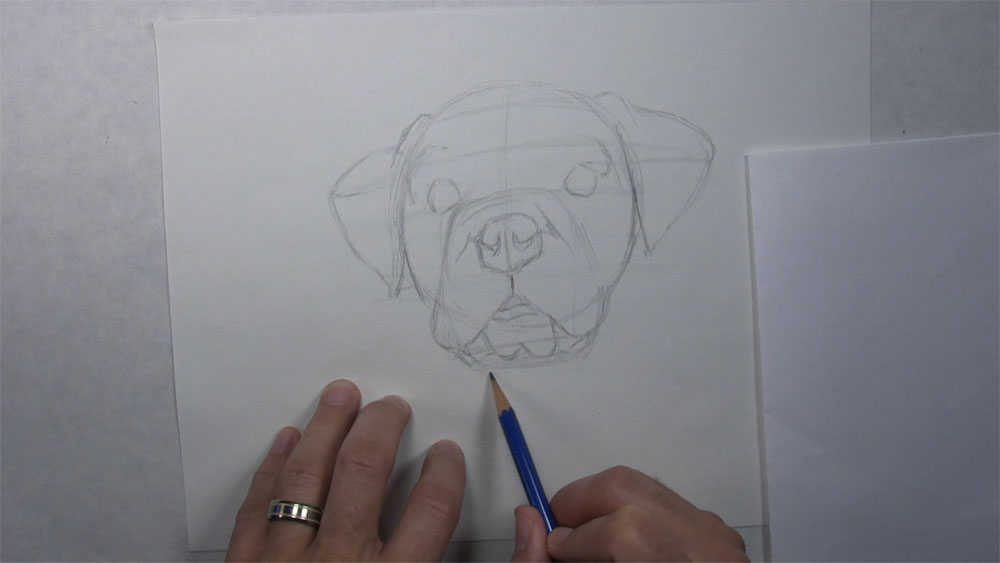
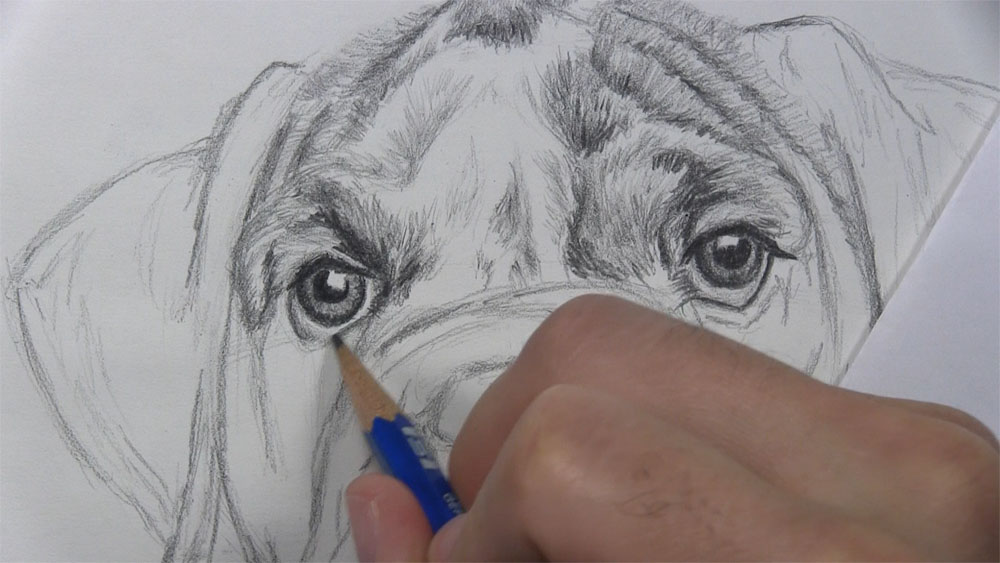
Now let's piece of work on developing the shape of the dog's eyes. Although this dog has some large eyes and very round eyeballs, the shape of the pare surrounding the eyes is very athwart. They almost resemble pentagons, but they still have some curvature.
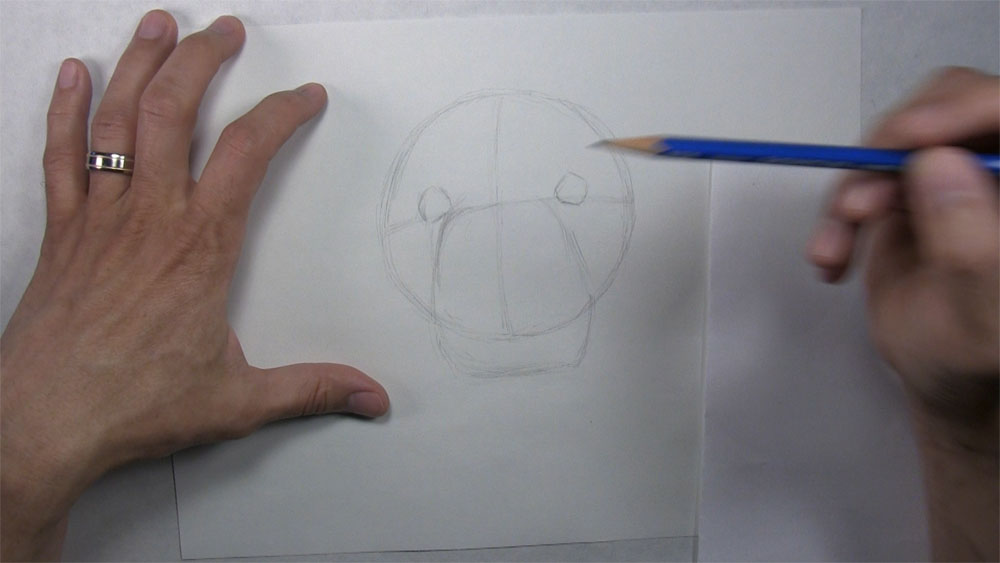
Start sketching the brow on the side of the face adjacent to the dog's right heart. That'll exist on our left side. Then sketch the outline of the nose. Pay attending to placement in relation to the surrounding features. For example, the left edge of the nose is a little to the right of the dog's right eye. Similarly, there is more than space betwixt the domestic dog's nose and his left middle due to the turn of his head.
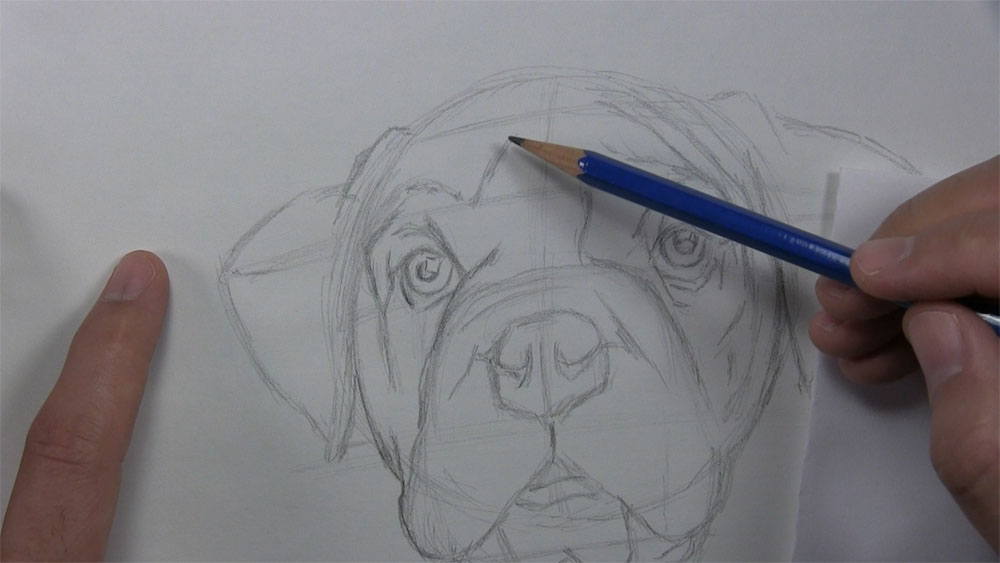
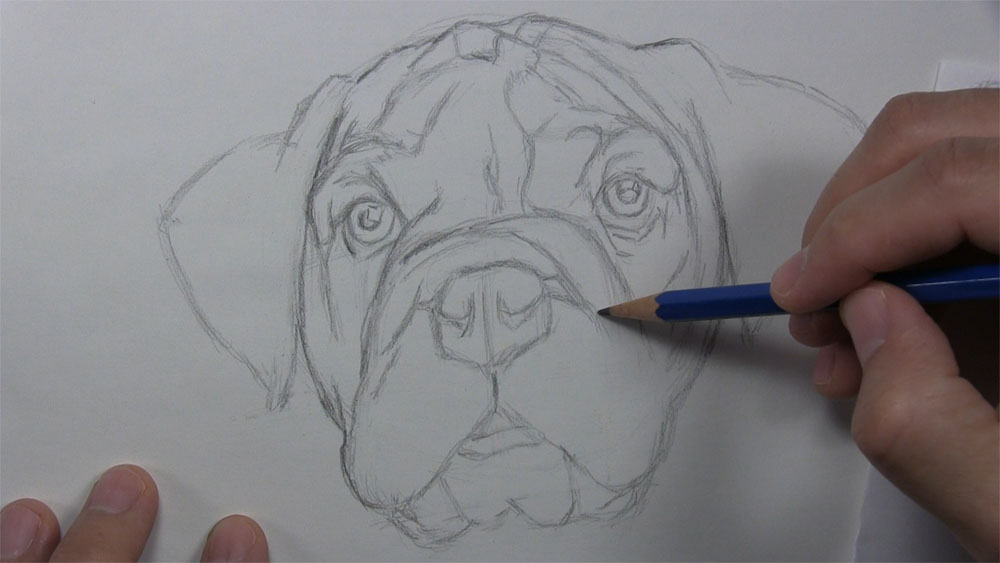
Depict the Dog's Ears and Olfactory organ
The bottom tip of the ear should align with the bottom of the nose. Also, the pointy side of the ear that sticks out is aligned with the upper portion of the eye. Depict a curved line from the bottom tip. Sketch the outline for the brow. Draw the upper edge of the ear from the outer tip to the brow. A little higher, draw a flap connecting the ear to the head.

Sketch a guideline from the get-go ear to locate the connection for the other ear. Then, sketch the forehead of the dog's left heart. Draw the side curvature of the dog's face up and the border of the ear along the side. The lower tip of the ear is slightly aligned with the outset ear and the nose. Utilize the outer tip of the first ear and the top of the dog'south left middle to locate the outer tip of this ear. Use a pencil to check the angle. Connect the ear at the head. This preliminary sketch of the dog ears is the first step in learning how to draw them.
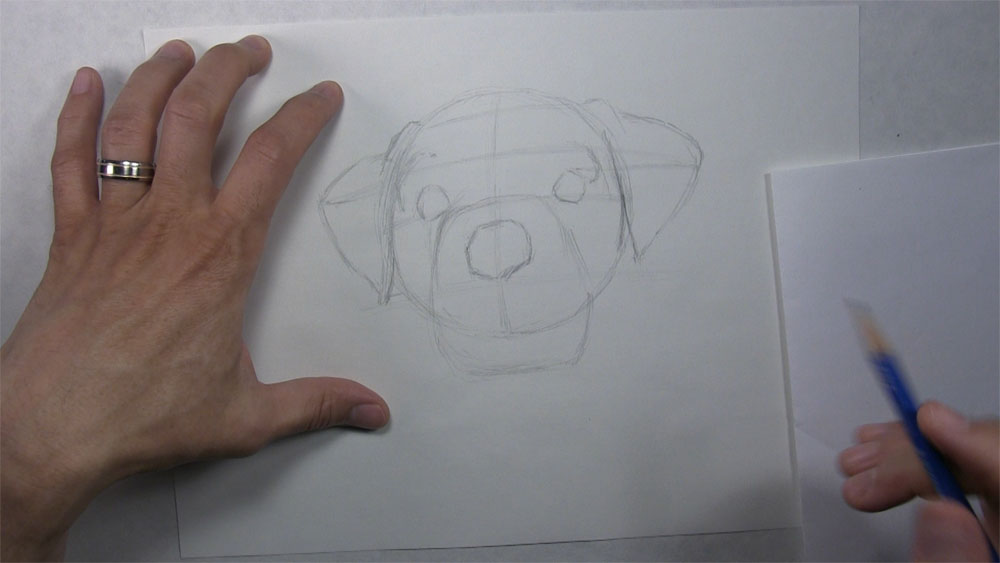
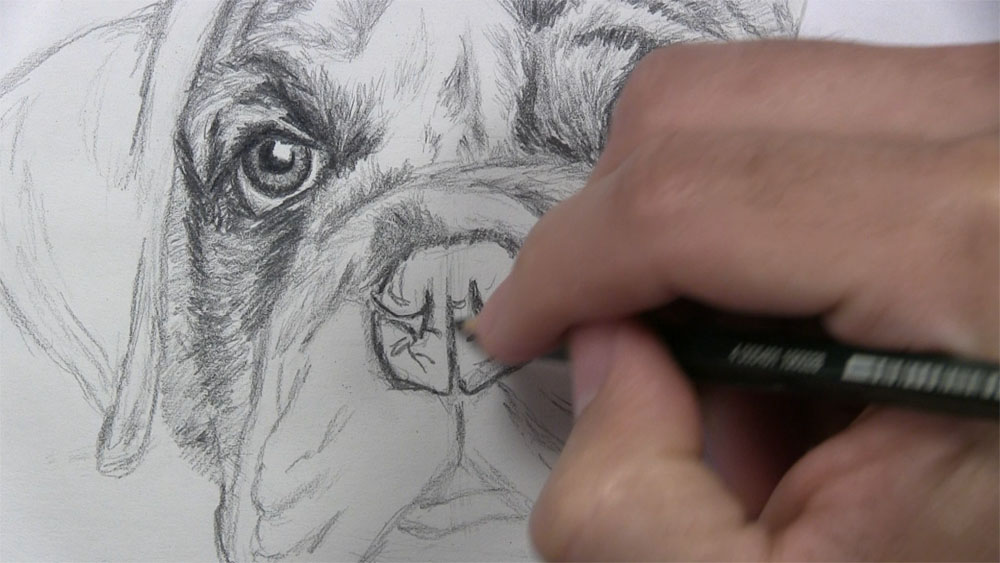
Draw a vertical line separating the olfactory organ into two parts. Then, sketch the nostril on our right side. Pay attention to the size of the nostril besides every bit the shape. Echo this procedure with the other nostril. Attempt to match the angles of the outline of the nostrils correctly in relation to the angles of the nose outline.
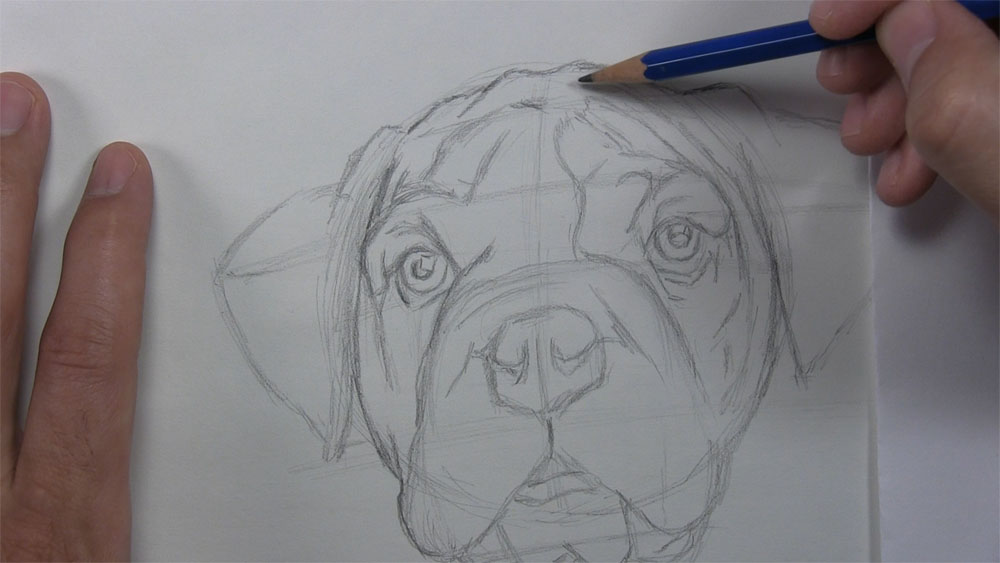
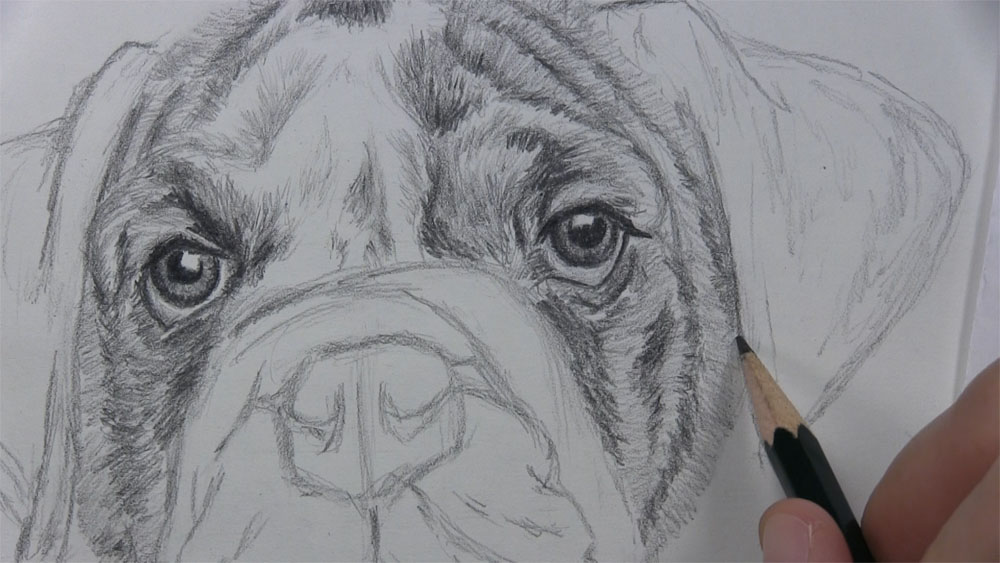
Draw the Domestic dog'due south Mouth
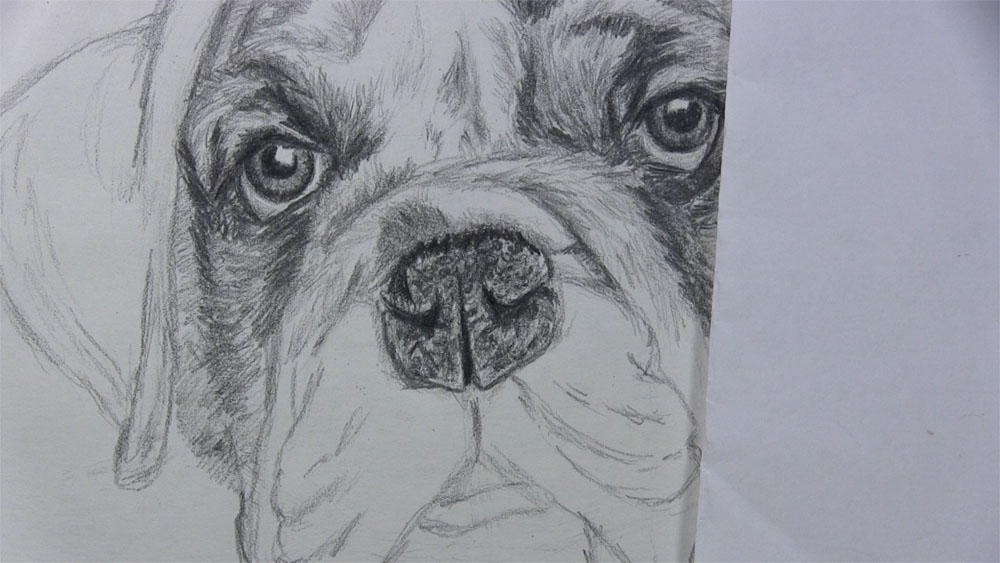
Since the face up of this dog we are drawing is the face of a bulldog, in that location are a lot of wrinkles or flaps, especially around the nose and rima oris. Commencement by sketching some wrinkles extending from the nostrils and a brusk line beneath the nose.
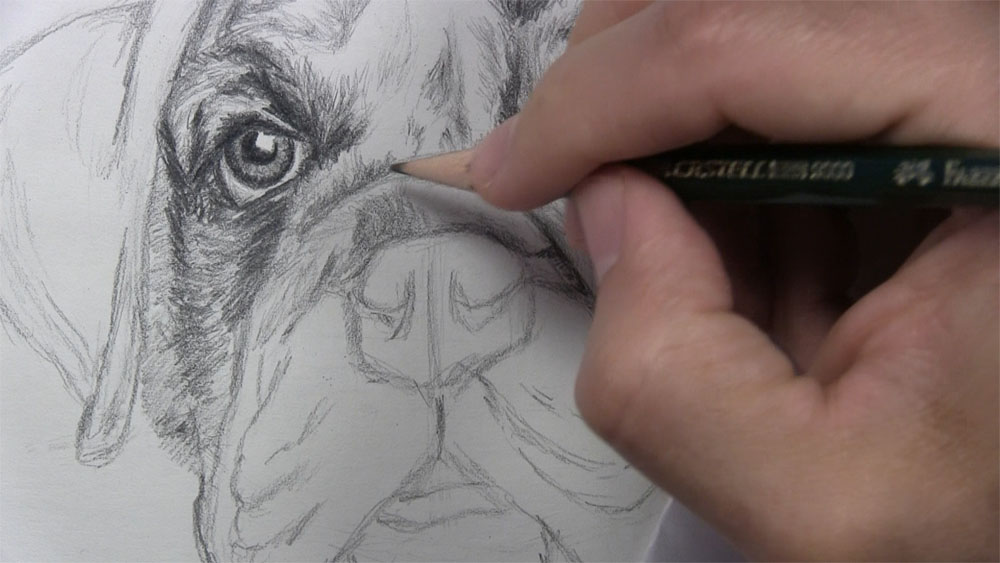
Now, let'south see how we can draw the mouth of the domestic dog in a fashion true to the reference. Starting time branching out the mouth from the short line below the nose. Keep branching out until you lot are aligned with the inner corner of the eye. Then kickoff curving the lesser of the snout. Repeat this on the other side. Check the slope of the line connecting both sides of the bottom to make sure information technology is the same angle as the horizontal guideline of our original circle.
Depict a slightly curved line to show the opening of the dog'south mouth. Repeat this for the bottom of the lip. Although nosotros don't have to with this cartoon, there will be occasions when cartoon a dog's rima oris requires you to draw its sharp teeth. Draw what looks like a "W" shape under the mouth. Go out a little space betwixt this and the lesser lip. Draw the lower area of the snout with some wrinkles along the lower edge.
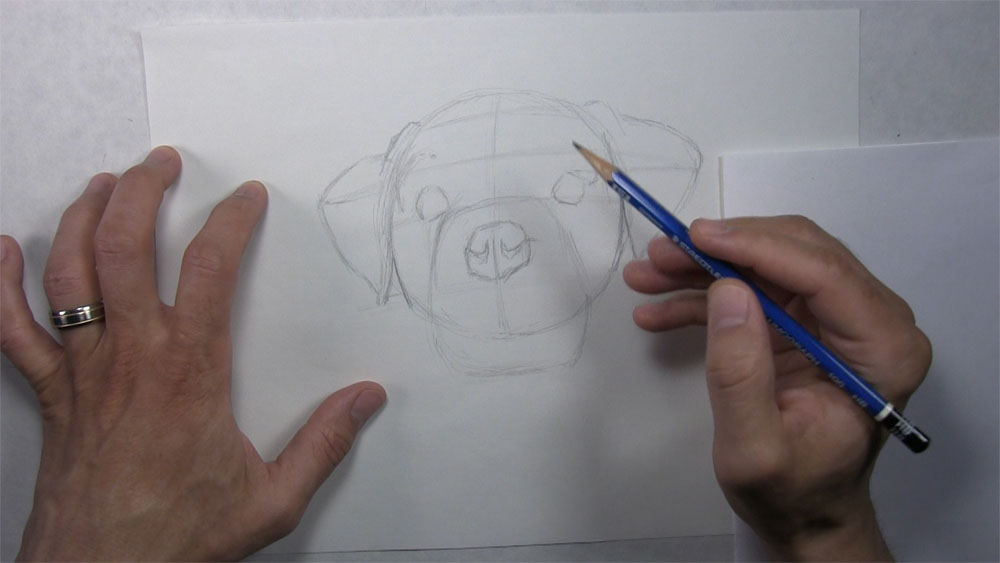
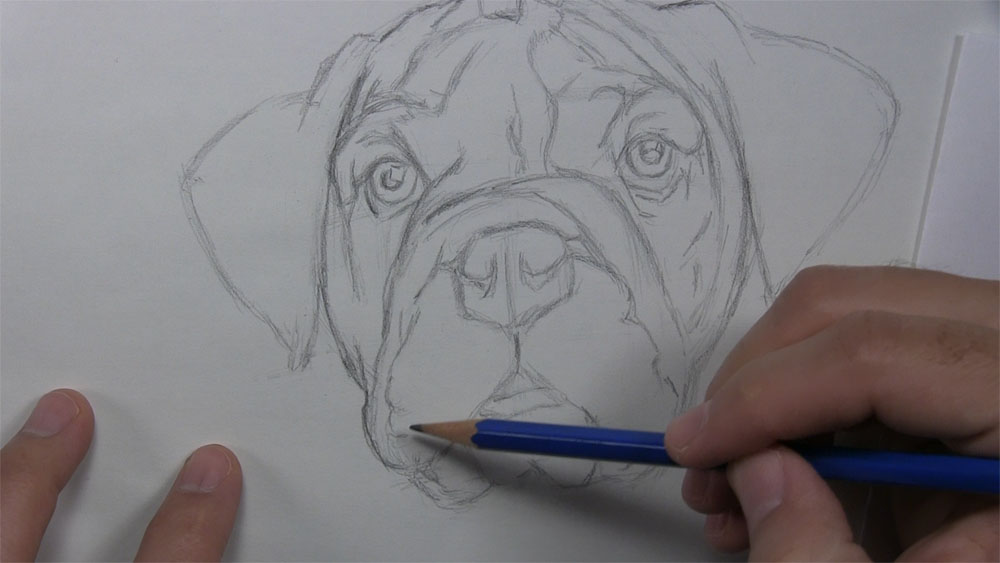
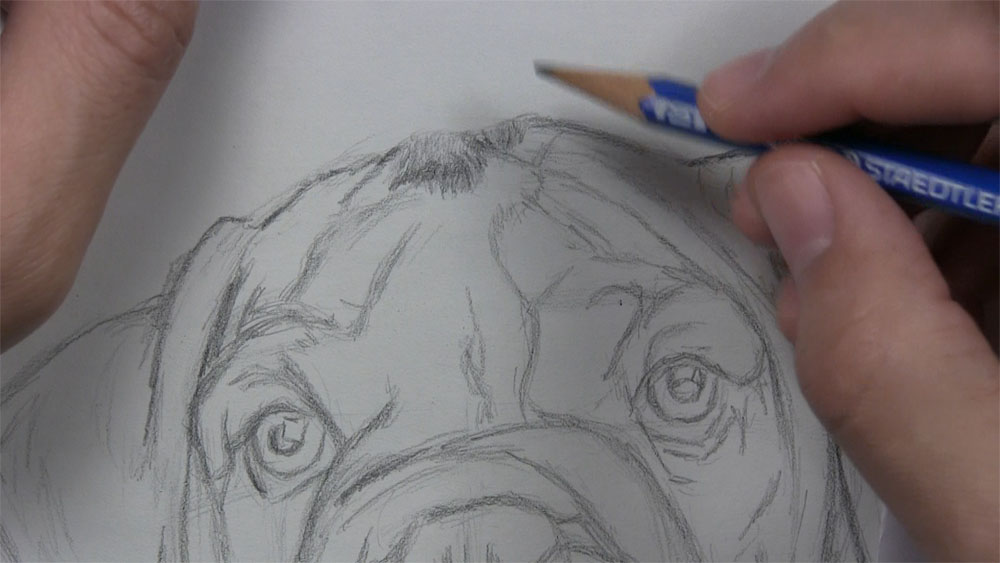
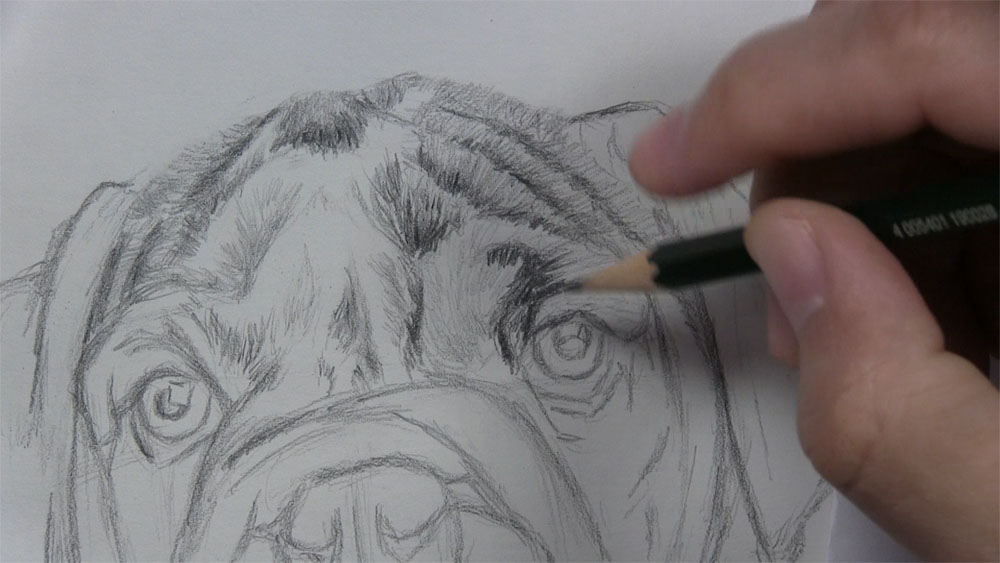
Draw the Dog's Eyes and Side of the Face
Here's how to draw dog eyes step by step. Starting with the eye to our left, I'm sketching a line on the underside of the brow to let for how much it protrudes. Then, nosotros can depict a squarish highlight. For this iris and pupil, attempt to draw them equally circular every bit possible. For the other eye, I'thou cartoon the iris and educatee first. I'thousand saving the highlight for last. The society doesn't actually matter. Just make sure y'all go out a little opening for the highlight.
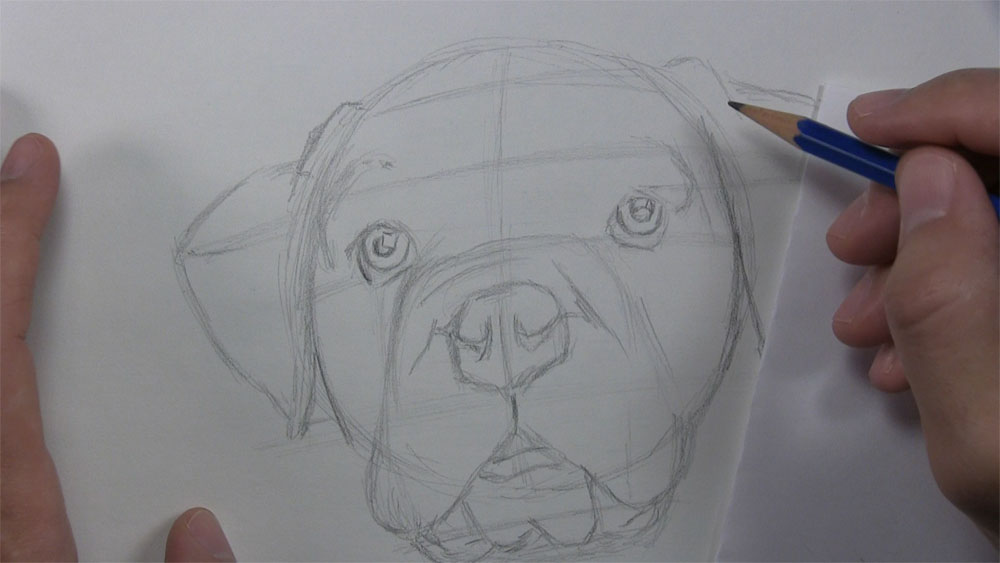
From the border of the iris, we can come across a little contraction on the brow. As nosotros go on looking at this forehead, nosotros can notice fifty-fifty more wrinkles. There are some pretty deep and significant ones at that. Keep drawing lines to develop the shape and wrinkles of the brow.
Sketch a thin line just under the middle to represent the eyelid. As well, there is a long fold or wrinkle on the side of the face running forth the forehead. Develop the top portion of the brow a chip more than. Draw a line running along the white patch of fur going downwards the domestic dog's brow. Curve this line downward to shape the side of the snout. Then sketch a few more than wrinkles under the middle and on the cheek.
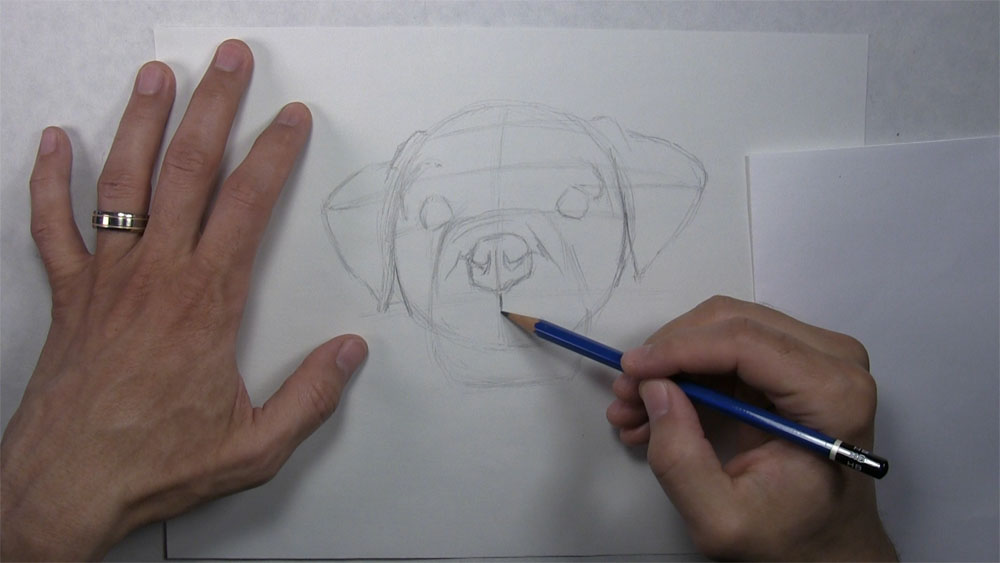
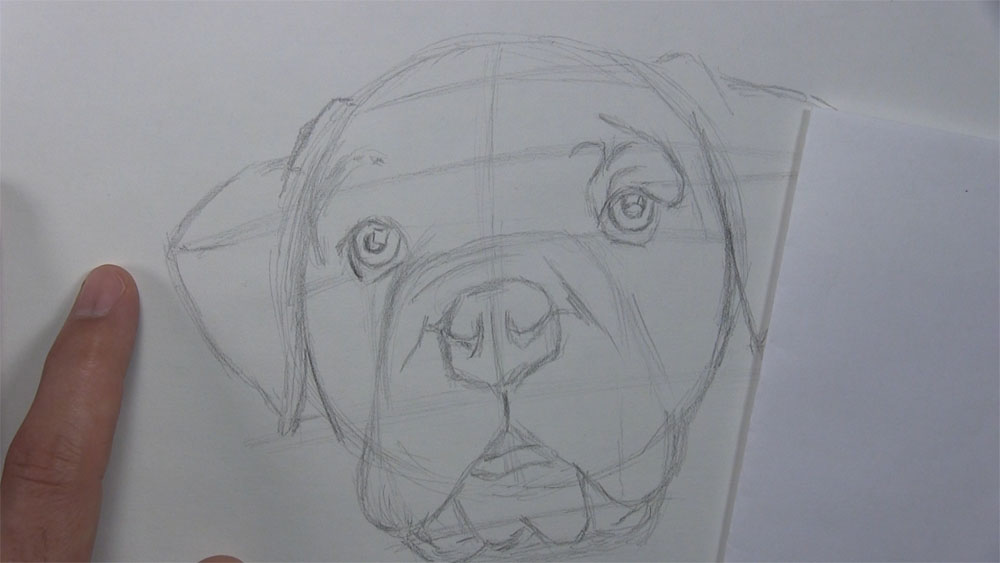
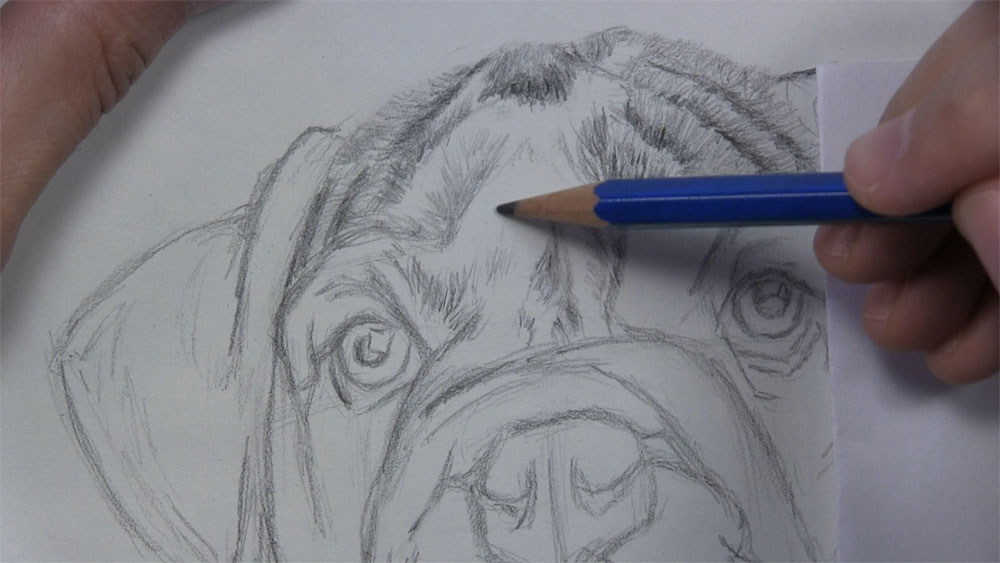
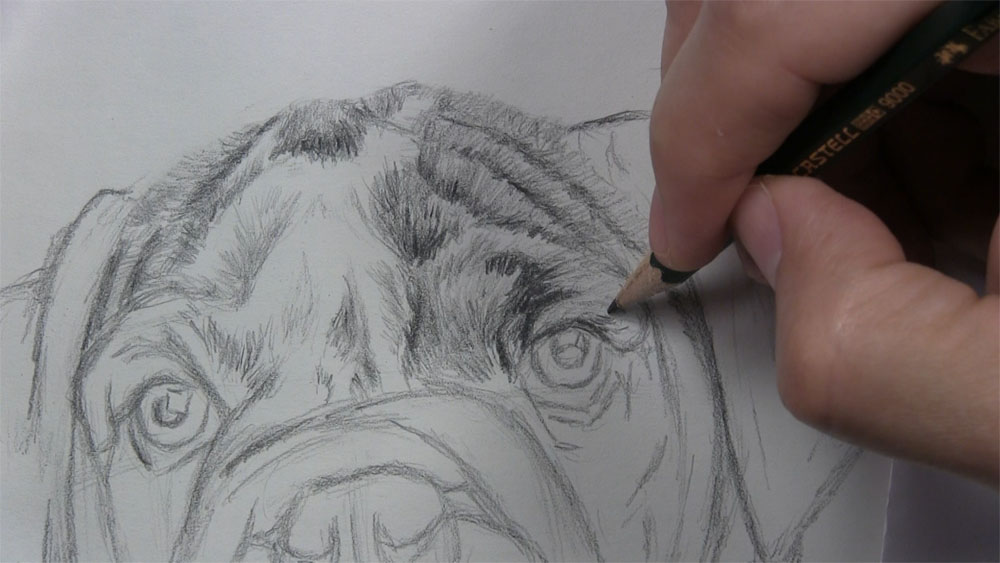
Draw the Remainder of the Upper Face
First, draw a tip to the bottom of the brow to the left of the dog'southward right eye. Then, draw a dip in the brow similar to what the other brow had. There'southward also a long wrinkle along this side of the confront. Now, I'm defining the outline of the snout. Since the caput is slightly turned, make sure the snout overlaps the corner of this centre just a petty. Sketch a few lines to develop the area above the brow.
Depict a line for the side of the face up that hides backside the canis familiaris'due south protruding brow. Draw the bumpy contour that is the top of the dog'south caput. Afterwards, start drawing some of the forehead wrinkles and the border of the white fur pattern. In that location are several overlapping layers of thick, flappy peel, and then it'due south helpful to use the reference photo every bit a guide.
Since we have our facial features in place, we no longer have a need for our guidelines. Apply a kneaded, plastic, or regular eraser to get rid of them. The kneaded eraser is all-time for maneuvering around those very tight areas.
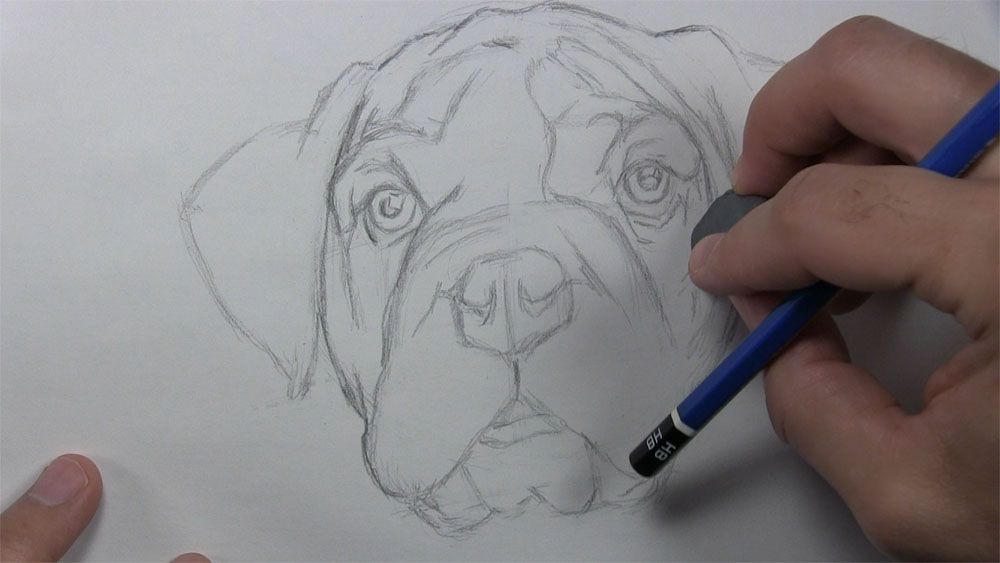
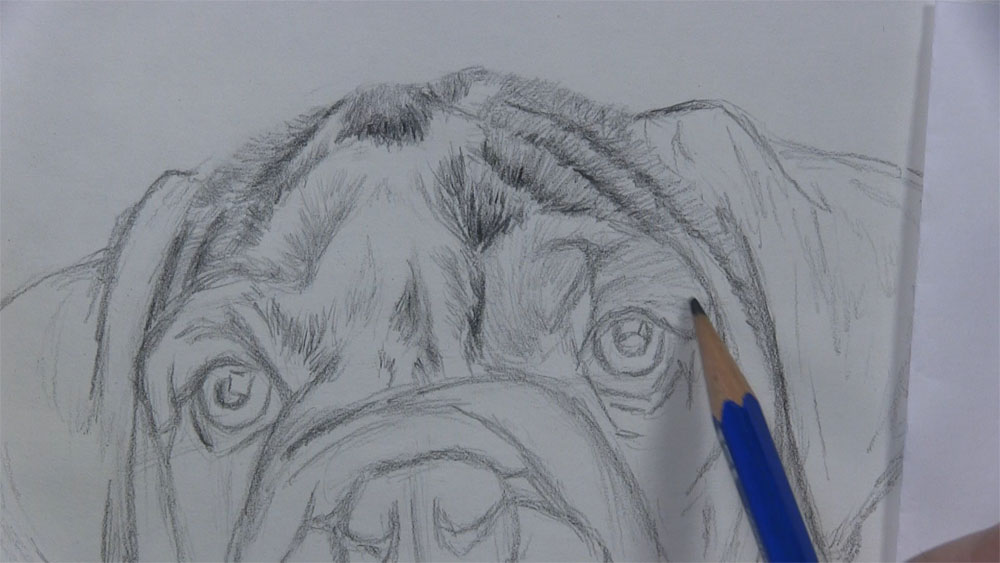
The blueprint pattern on this dog or any other animal must follow the bends and folds of the surface upon which information technology lies. Describe the outline of the white fur blueprint. Make sure to bend the outline upward and around the wrinkles. Draw the pout lines, or forehead furrows, between the optics, simply higher up the dog's left nostril.
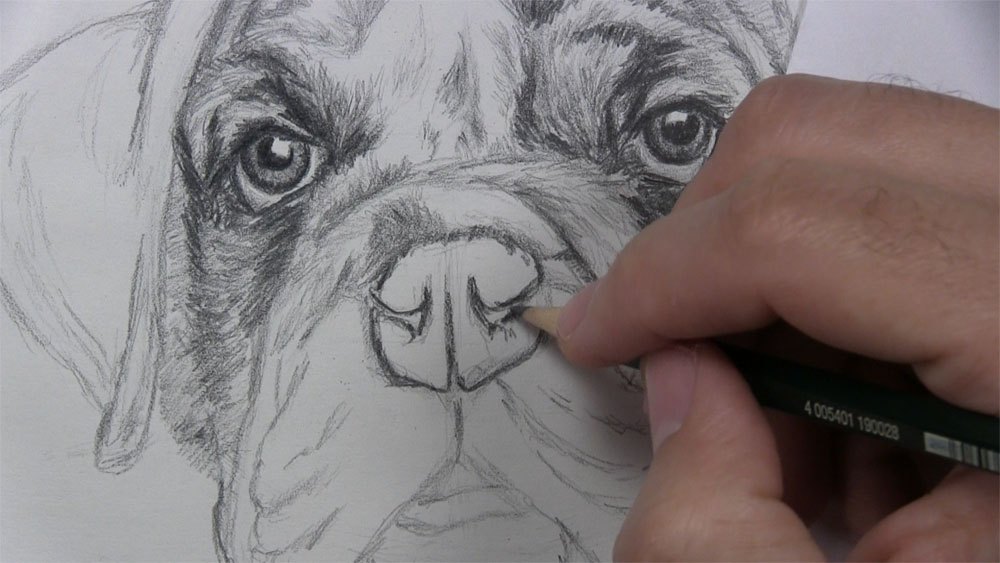
Finish Outlining the Snout and Ears
Now, allow's work on the snout. We have some thick overlapping folds hither above the nose. Sketch a line coming downwards abreast the nose. Sketch a shorter, somewhat horizontal line immediately to the right of the nose. Proceed working your way down.
Describe a bumpy line going downward each side of the snout. These lines correspond the outer edges of the rows of wrinkles between the nose and the mouth from where some of the whiskers originate.
From these two outlines, just brainstorm sketching very lite lines indicating the folds. These light lines should travel upwards toward the nose. Also, there is a bit of curvature on some of the lines.
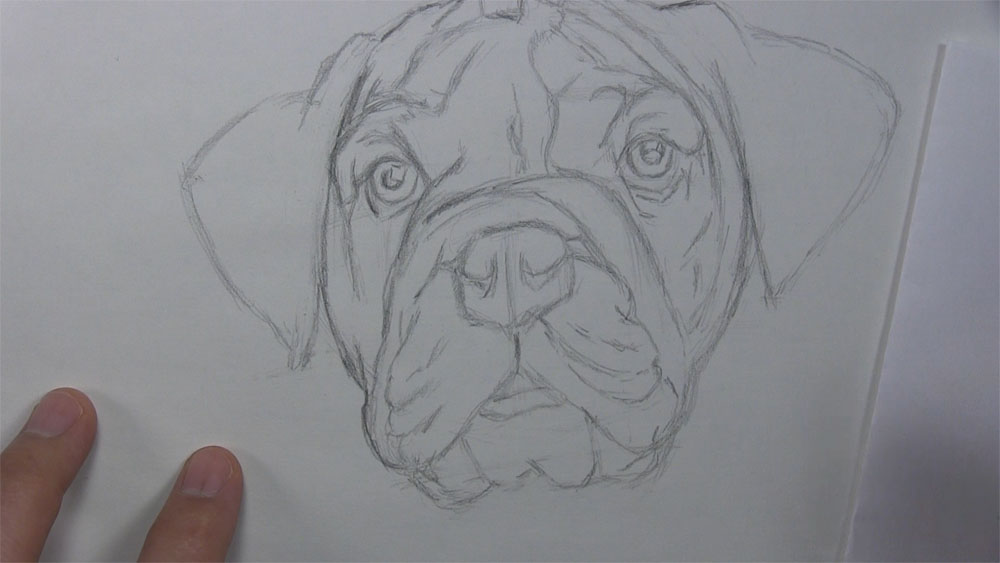
Sketch an indication of tonal value changes on the ears. These light lines will be helpful during the shading process. They will let united states know where nosotros demand to shade lightly and where we need to shade a flake darker.
That just about does it for how to draw the outline of a canis familiaris face.
If you would like an easier and more accurate way of cartoon the outline than the freehand method we used here, y'all can try the grid method, transfer method, or a plot-point method for more than support. I have grids, outlines, and plot-point downloads for this tutorial and others available for members of the Allow's Draw Today Lodge.

Of form, if you draw a dog face merely fail to shade information technology, some people might consider something to be missing. Therefore, we'll look at the shading steps next.
Shade the Forehead
Starting with the tiptop of the dog'southward caput, I'm sticking with my HB pencil as I add a light base layer of fur. Nosotros will gradually build upward the fur with darker layers of value. For a more jagged, furry edge to show where the outlines are, brand sure to erase the outline earlier drawing the fur. Keep your pencil strokes nice and brusk. Past the way, the steps I evidence y'all for how to draw canis familiaris fur are the same basic steps for drawing all creature fur.
Go along drawing more fur for the top of the dog's head. Use the same method. Make sure you don't put too much shading in the white fur on the forehead. Call back to add shading between the wrinkles likewise. E'er describe fur in the direction of pilus growth.
Shade the Canis familiaris's Brows
Over the dog's left eye, erase any stray guidelines. And so, darken the ridge between the white fur and the brown brow. On the brow itself, put a light layer of hair. Notice that the direction of the hairs is shifting to the right as we work our way to the correct on this brow.
I'm switching to the 2B pencil for some shadow marks nigh the elevation of the brow. There is a deep groove in this canis familiaris'southward brow, so put some darker tones in this area. The hairs are branching out from the inside, so let's brand our marks that way to show information technology.
Start calculation a 2nd layer of fur atop this first layer. Stay consistent with the direction of hair growth as yous depict the marks. Leave some areas untouched to show highlights in the fur. Go forth the border between the white and brown fur and sketch more hairs on the brown side. Concealment the dark-brown hairs volition make the white hairs stand up out that much more.
Shade the dog's right brow in a similar way. Depict hairs radiating from the corner, upward effectually the center, and so pointing toward our left. Add darker tones to the inner corner of the center. Use an HB pencil for a lite base layer of fur before switching over to the 2B pencil for darker values.

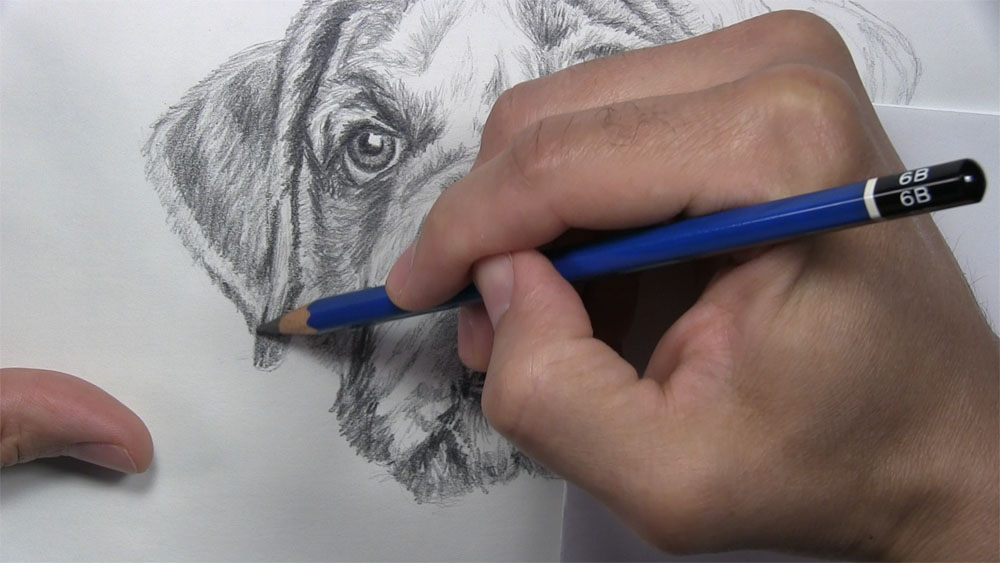
Shade the Dog's Optics
The optics of dogs (and eyes in general) accept a rich range of lite and nighttime values. Therefore, it makes sense to employ dark and lite pencil tones when cartoon them.
I'm going to start on the pupils, and I want them to exist a very dark tone, then that's why I am using a 6B pencil. Starting time by outlining the pupil, and and so shade the inside. Be very careful to preserve the highlight. Repeat this process with the other pupil. After that, outline the iris of each eye.
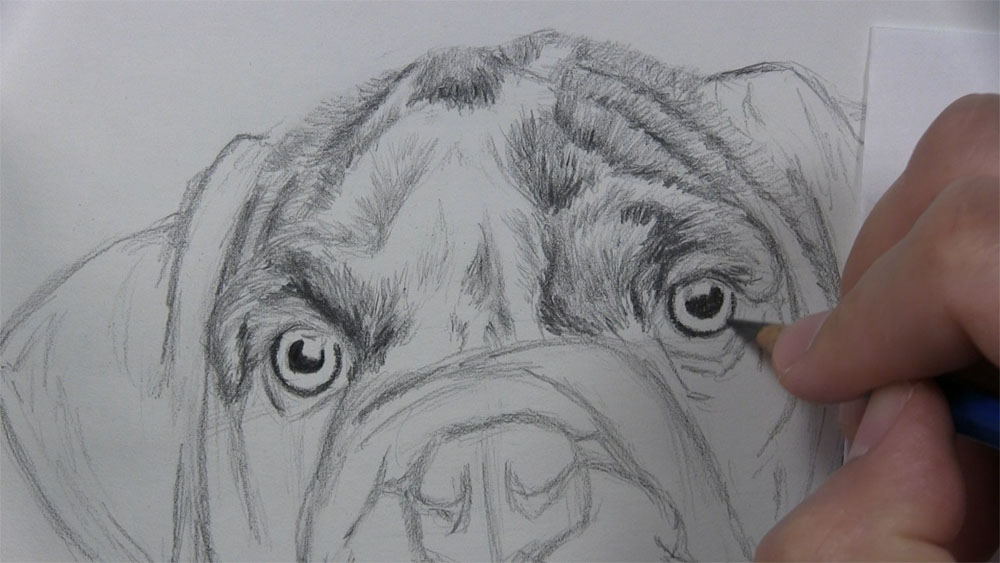
The irises are typically a lighter value equally you get closer to the pupil. Therefore, I'm switching now to a 2B pencil. Sketch along the inside edge of the circle to make it appear thicker. As for shading, pretend there is an imaginary dot in the centre of the educatee. Then make lines very shut together radiating from that imaginary dot outward to the edges of the iris. Practise the same thing with the other center.
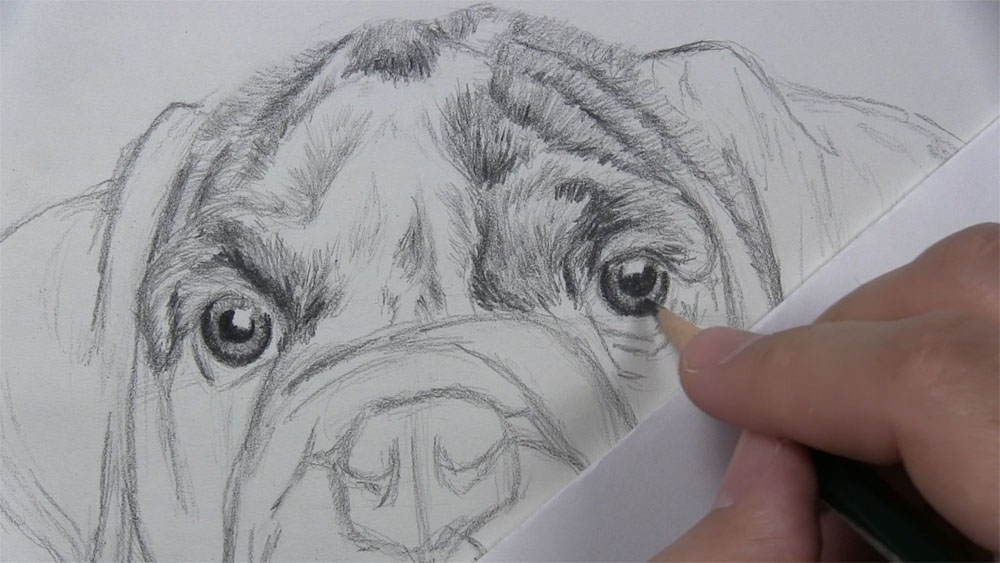
Okay, now it's back to the 6B pencil. As we know, our canis familiaris has some very thick brows above the eyes. These thick brows stick out beyond the eyes, and therefore, cast a shadow underneath. Use the 6B to sketch a representation of this shadow and perhaps even some eyelashes. This also helps to better ascertain the lesser of the brow.

Then, I take my HB pencil now to shade merely the outer border of the eyeball. We must recall that the eyeball is a sphere, and as lite hits a sphere, the light gradually fades equally you get closer to the edges of the sphere. Nosotros can outline the eyelid much darker though. Sketch some minute hairs at the corners of each middle.
Draw Fur on the Sides of the Dog'south Confront
Sketch fur on the sides of the face. Begin with a light base layer. Sketch most of the hair growing towards the outside edges of the face. Recall to erase the outline along the edge of the face up earlier sketching the fur in that location. Sketch another darker layer of fur on top of the base of operations layer. Some of this fur might curl upward or abound in different directions.
Keep adding darker tones around the eyes, from the lower eyelids to the outer corners of each eye. This extra shading effectually the eyes helps to add together more grade to the brows and surrounding features. Additionally, go on looking for other areas that need more tones practical to meliorate distinguish between the white and brown fur. For the fold on the snout closest to the domestic dog's left eye, sketch some light downward hairs in the eye of the fold. Define the outer furry border of the fold by placing some darker tones side by side to the white hairs.

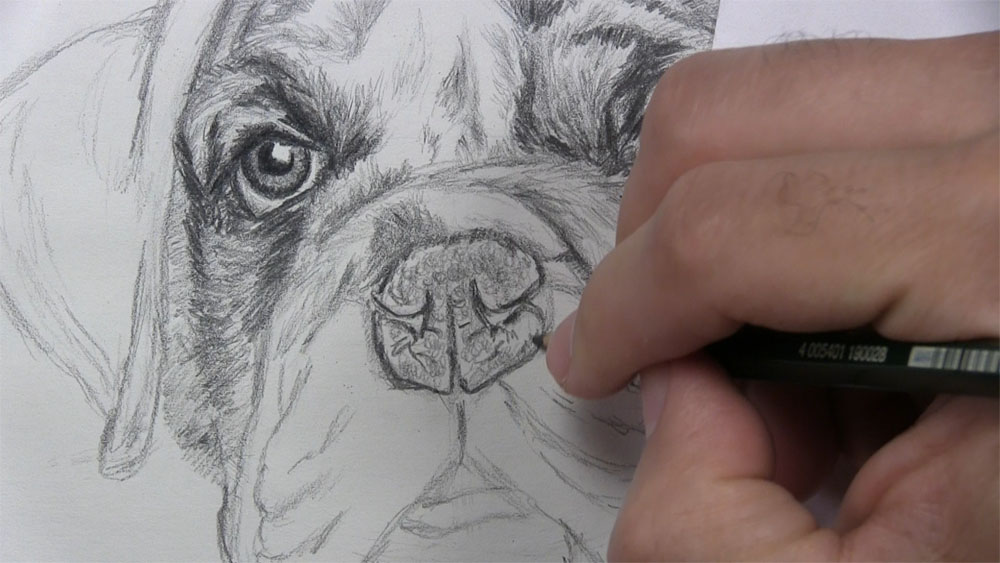
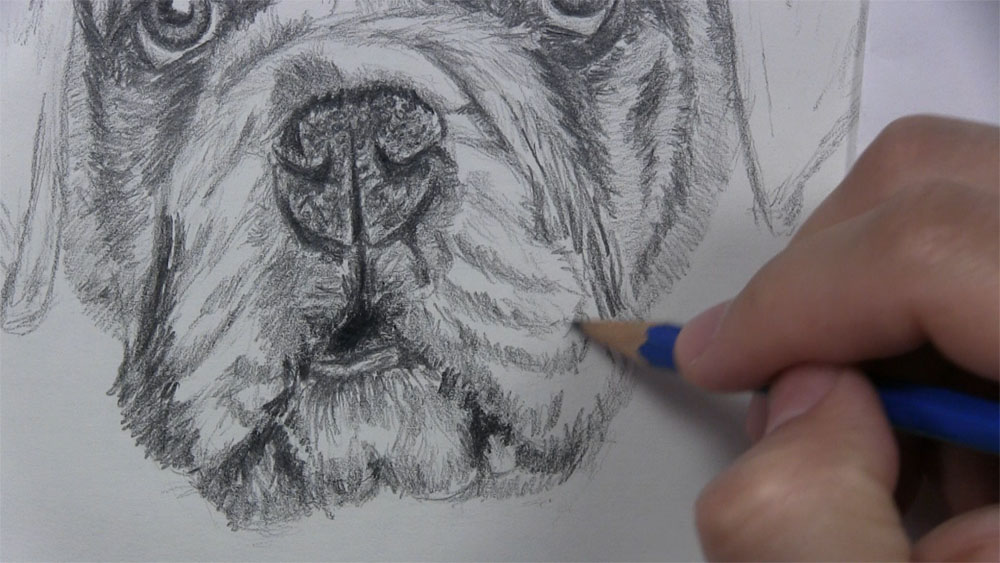
Shade the Domestic dog'due south Olfactory organ
We're just about ready to shade the canis familiaris's nose, only commencement let's shade the area merely in a higher place it. As I add the hairs on this fold, I'm putting a little twist to them forth this edge just to help show the coil shape of the fold. Now, this dog has a spot on this fold just above his nose. Beginning past sketching the outline of the spot. Then shade darker tones inside.
Okay, in the next several steps, I will testify you how to describe a dog'due south nose with shading that creates the nose'due south bumpy texture. I'chiliad putting a jagged texture along the top edge to represent the fur that'due south sticking out from the fold and beyond the nose. And so, outline the contours of the nose.
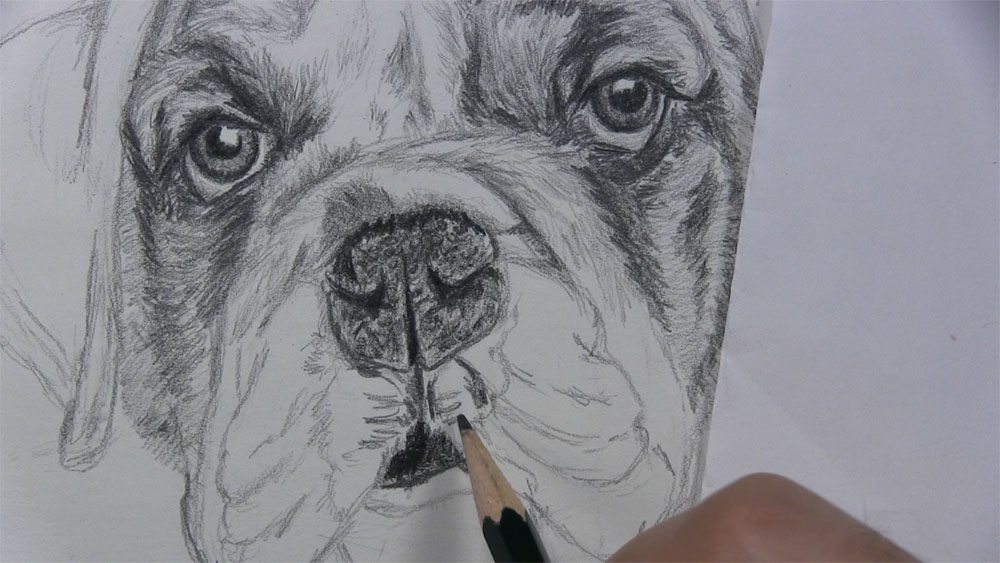
Get-go developing the texture of the olfactory organ by drawing some lines coming from the edges to the inner areas of the nose. You tin imagine these equally lilliputian grooves in the olfactory organ and even see them in the reference.
The dog's nose has these circular bumps on the surface. We tin begin to create a texture that resembles these bumps by drawing light, little circular scribbles on the surface. Scribble effectually the picayune grooves fatigued in the last step.
Brainstorm shading the nostrils and the various cracks forth the outline of the olfactory organ. Since the nose has some very dark tones compared to the residual of the cartoon, it's a good idea to switch to the 6B pencil to go over the darkest areas.
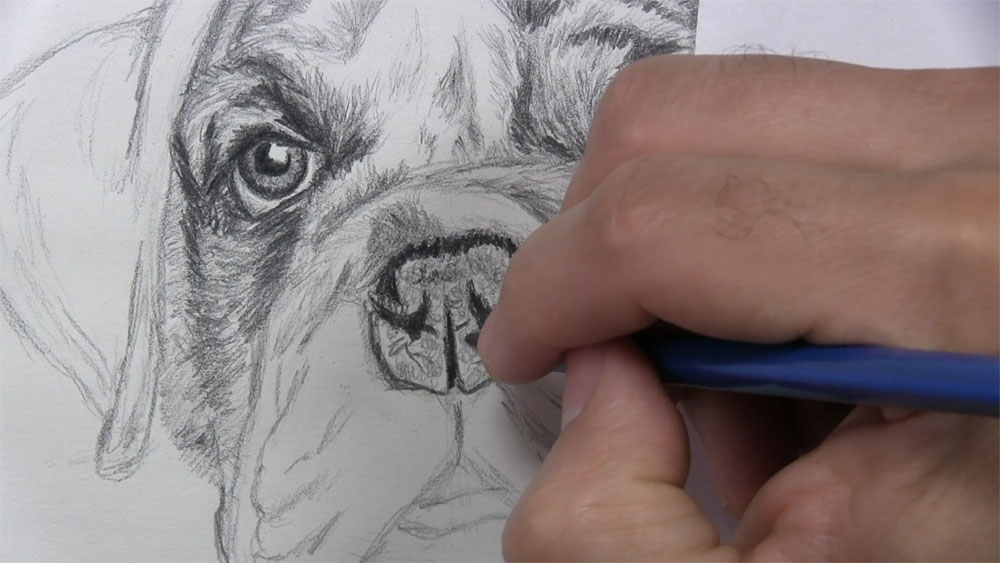
Continue using the 6B pencil to trace over the grooves and cracks on the nose's surface. Then, build up the texture with a layer of dark circles and ovals. Rather than the scribbles from before, draw fewer private round shapes, but still cover the surface.
With a 2B pencil, shade the olfactory organ area one concluding fourth dimension. Shade over and around the various round, bumpy shapes. Leave some of the edges of the nose and cracks a little lighter to resemble subtle highlights.
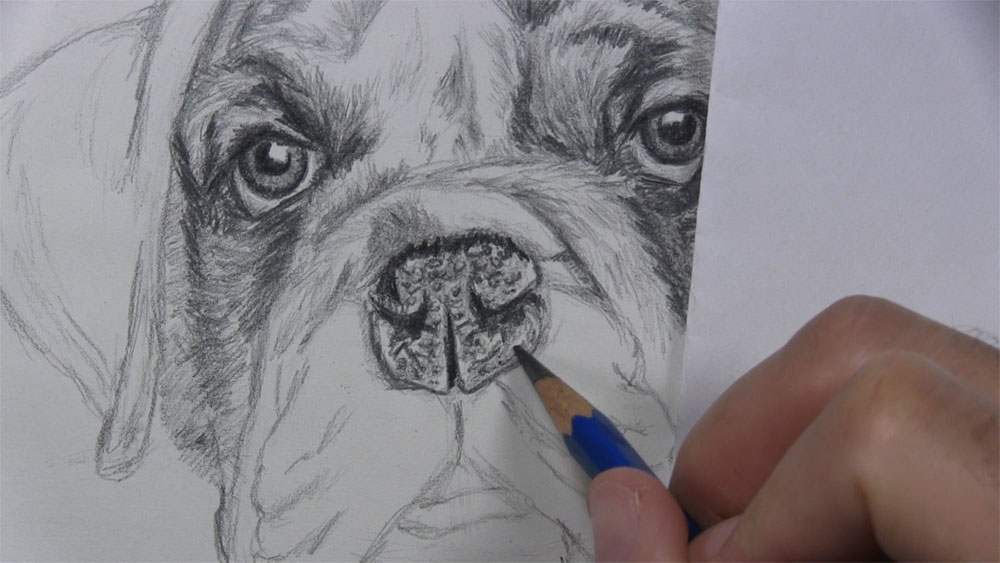
Shade the Dog's Mouth and Snout
Trace over the vertical line extending from the nose to the mouth. Sketch fur over the outlines going down each side of the mouth. Trace over the outline for the elevation lip too. Then with a 6B pencil, shade the inside of the mouth very dark.
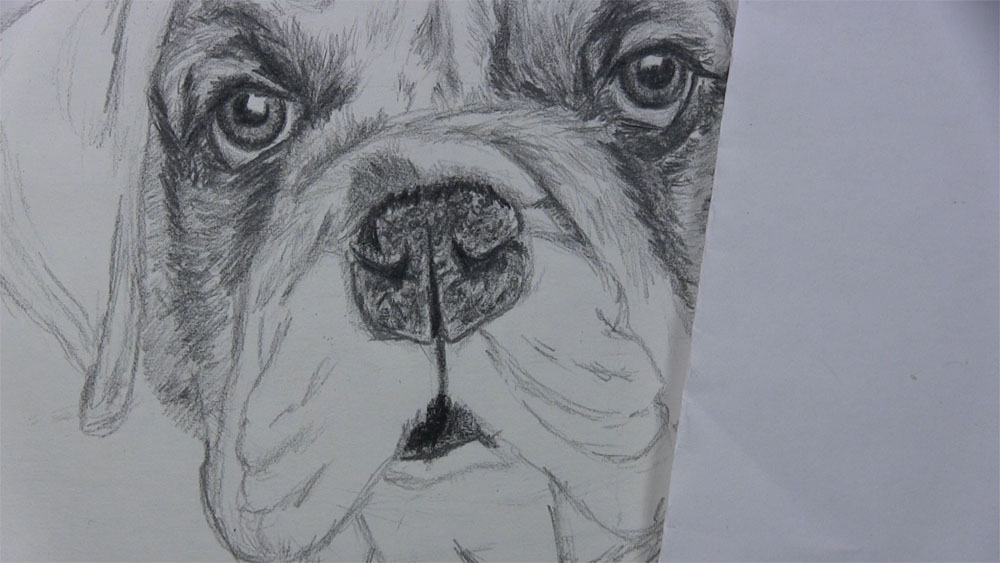
Like to the spot to a higher place the olfactory organ, this dog has a large spot or birthmark covering the area betwixt the nose and oral cavity. Sketch its outline likewise as some texture details on each side of the vertical line joining the nose and rima oris.
To shade this spot, I'thou starting with a general base layer of diagonal strokes to cover the unabridged surface. So, I'g going over information technology again with a 2nd layer of shading. However, this time my strokes are shorter to more than closely resemble hair. Finally, use darker tones to acuminate the edges just nether the nose and around the rima oris.
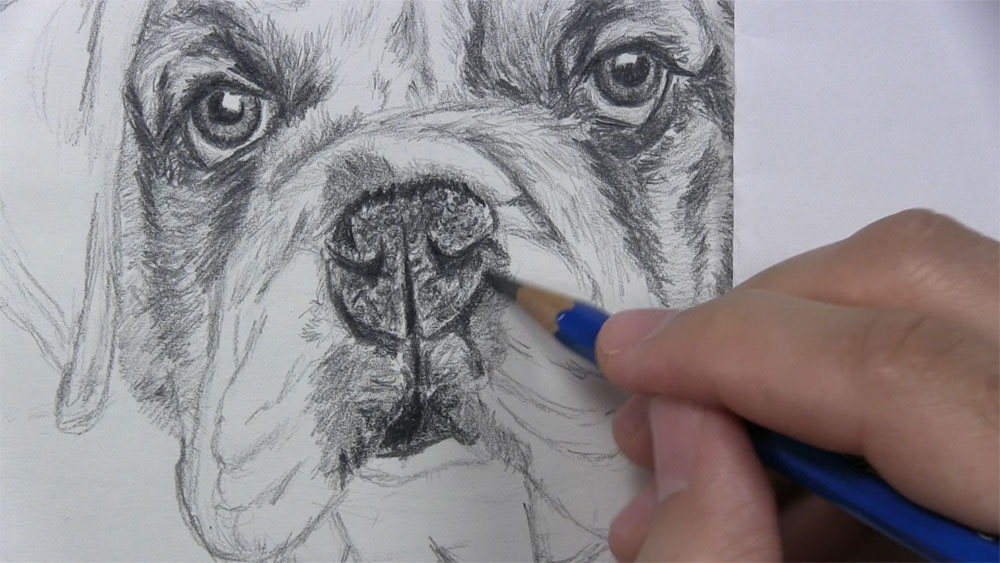
Use a light bear on to sketch the white fur on the sides of the snout. The lower left area of the snout should have much darker fur. Sketch the fur under the dog'southward oral fissure. Use a mix of shadows and lines coming downward from the oral fissure. You may notice that the correct side of the snout does not have the dark patch of fur that was found on the other side.
Shade the Ears and Finish Drawing the Canis familiaris Confront
Now let's piece of work on the ears. Sketch a base layer of tones on the domestic dog's correct ear, taking care to identify darker values in the proper locations. Sketch another layer of tones to build up the texture of the fur. Replace the outline of the ear with brusque strokes to resemble the hair on the edge. Use a 6B for the darkest areas.
Echo this process for the other ear. Sketch a base layer of shading for the ear. Use brusk pencil strokes along the edge of the ear to create that furry expect. Build upward the layers of fur on the ear with additional shadows.
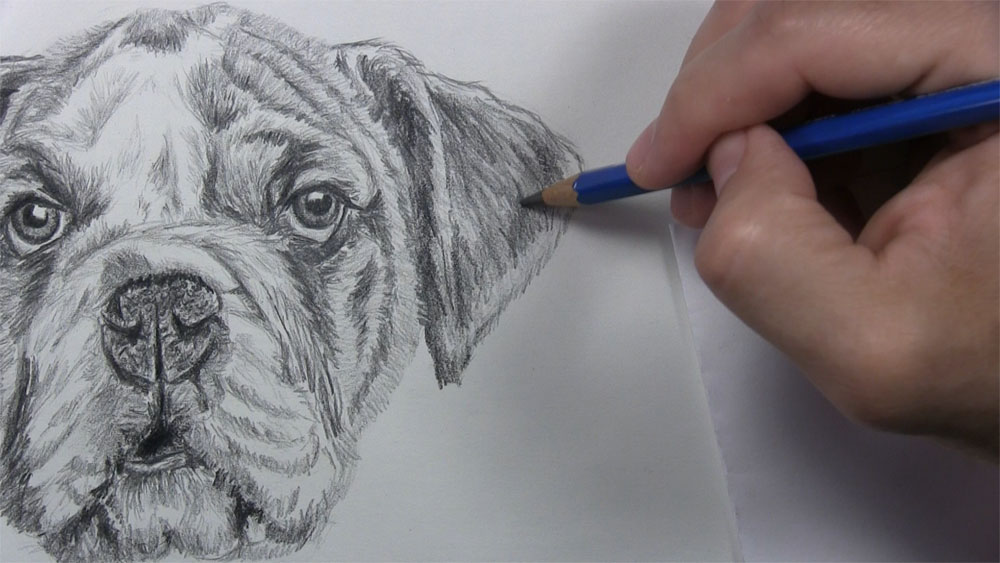
Okay, we are nigh washed. It's time to add together the finishing touches. Look for opportunities to brand lighter values stand out ameliorate past creating darker values side by side to them. Keep sketching over other parts of the face to build upward volume while still preserving highlights. Don't forget to add the whiskers!
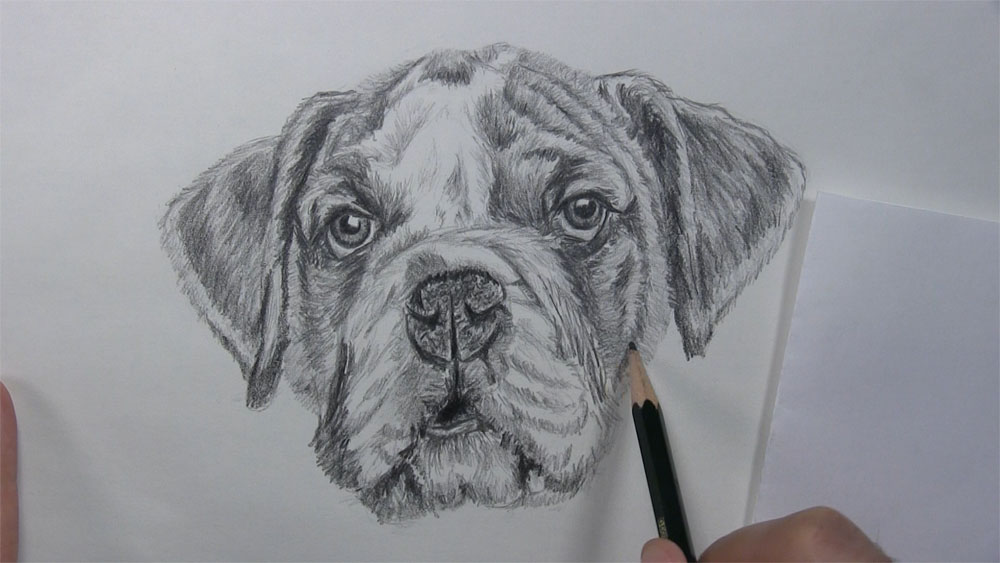
And that is how to draw a canis familiaris confront with realistic features!
Tutorial Recap
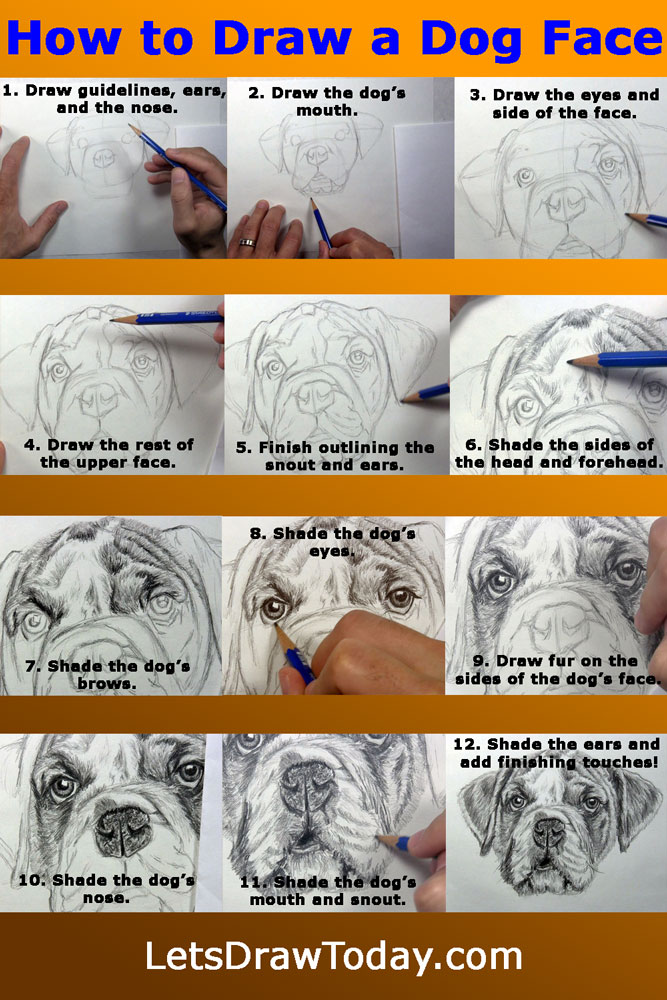
For a quick visual recap of this tutorial, take a look at the image below. Information technology shows you a progression of the main steps for how to draw a canis familiaris face, from the outline to the final issue.
Tips to Remember the Next Time Y'all Draw a Dog Face
Here are a few tips to proceed in listen for the next time you want to draw the face up of a dog.
- Piece of work from a reference photograph so you can stay true to the characteristics of the breed of dog yous are trying to draw.
- Break your canis familiaris face into basic shapes that resemble the parts of the face. So focus on one area and draw one feature or detail at a fourth dimension.
- Consider using both a colour and a black-and-white version of your reference. A black-and-white reference allows y'all to have some of the guesswork out of applying low-cal and dark values. A color reference is useful when you are working on an area of the drawing that has 2 different colors adjacent to each other. A proficient instance from this tutorial is the domestic dog's white and brownish fur on the forehead. This allows you to take steps to ensure the color change is apparent in your shading.
- Try drawing a variety of dog faces of different breeds. The only mode to truly get better at drawing domestic dog faces is to practice as much as possible!
These tips piece of work only as well for cartoon other animals likewise!
Attempt the Extended Tutorial
Need more assist? In the extended version of this tutorial, I go over how to draw the brow of the dog, sides of the confront, snout, ears, and more in greater detail with more than step-by-stride images. I besides have both color and black-and-white reference photos available. Plus, for each step in the extended version, you will see the real-fourth dimension video demonstration from which all of these stride-past-step images originated.
You can get full access to the extended version of this and all of my other tutorials past becoming a member of the Allow's Draw Today Order.
I hope yous have found this tutorial to be helpful, and I wish you the all-time of luck in all of your hereafter attempts at drawing a domestic dog face!


Source: https://letsdrawtoday.com/how-to-draw-a-dog-face/
Posted by: gridercovest.blogspot.com
0 Response to "how to draw a realistic dog"
Post a Comment